With the release of Proxmox 4 we are getting IPv6 support including LXC containers. This comes at the cost of OpenVZ container (unless you want to install custom patches) but I feel it’s a step in the right direction. Over the past week we got a new Hetzner box and in this tutorial I will show you how to install Proxmox 4.
After you get the credentials to your new Hetzner server with Debian Jessie Minimal (version 8.2), you can login as root and begin. The first step is to install the proxmox kernel.
Step 1: Prepare for Proxmox 4 installation
The first thing we will do is edit /etc/apt/sources.list in order to add the Proxmox repository:
vi /etc/apt/sources.list
and add the following line:
deb http://download.proxmox.com/debian jessie pve-no-subscription
It should look something like this:
We then run the following command:
wget -O- "http://download.proxmox.com/debian/key.asc" | apt-key add -
in order to get our key so that we can run the apt update and later install.
Go ahead and run:
apt-get update
apt-get upgrade
apt-get dist-upgrade
In order to update/upgrade everything.
After this is done, we can install the Proxmox kernel.
Offtopic: If you want to check out some of the available packages (and addons) for Proxmox you can run:
apt-cache search proxmox
Step 2: Install Proxmox 4
Continuing.. we run the following commands to install Proxmox (current latest v4.2.6-1):
apt-get install pve-firmware pve-kernel-4.2.6-1-pve pve-headers-4.2.6-1-pve
We can then go ahead and reboot the server:
reboot
After the server comes back up (around 5min normally) we need to make sure that we are running the Proxmox kernel. Running
uname -r
should show something like: 4.2.6-1-pve (notice the pve at the end). This means Proxmox was successfully installed. You can also run
cat /proc/version
instead of the previous command, similar output.
Now that the Proxmox kernel is installed we need to install the Proxmox Virtual Environment. This is simple enough and you just need to run:
apt-get install proxmox-ve
Go ahead and reboot the server again:
reboot
Step 3: Configure Networking
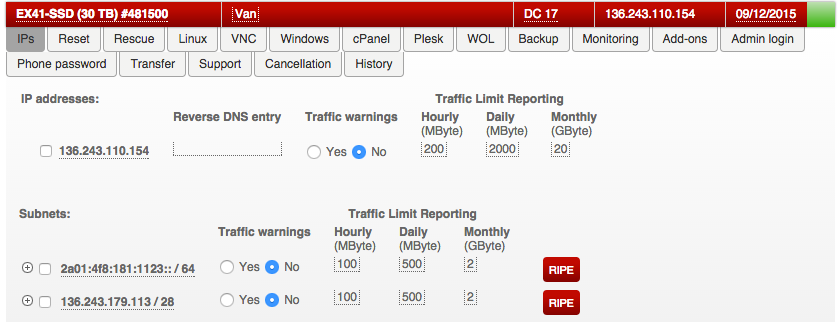
In order to be able to create virtual machines using Proxmox, we need to have additional IP addresses. For this purpose I will show you how to configure your machine by having only one static IP address from Hetzner including an additional subnet (in my case /28). Below is an example screenshot of the server panel @ Hetzner:
Since we are doing a routed setup, you must enabled IP forwarding by running the following commands:
sysctl -w net.ipv4.ip_forward=1
sysctl -w net.ipv6.conf.all.forwarding=1
Now keeping this in mind we need to configure the server network interface settings. To do this, login back as root to the server and edit /etc/network/interfaces.
vi /etc/network/interfaces
The default setup will look something like this:
# Loopback device:
auto lo
iface lo inet loopback

# device: eth0
auto  eth0
iface eth0 inet static
  address   136.243.110.154
  netmask   255.255.255.192
  gateway   136.243.110.129
  # default route to access subnet
  up route add -net 136.243.110.128 netmask 255.255.255.192 gw 136.243.110.129 eth0

iface eth0 inet6 static
  address 2a01:4f8:181:1123::2
  netmask 64
  gateway fe80::1
We will change the above configuration to the following:
auto lo
iface lo inet loopback

auto eth0
iface eth0 inet static
        address  136.243.110.154 #our main ip address
        netmask  255.255.255.255 #we just need the one IP
        pointopoint 136.243.110.129 #more: http://goo.gl/jGVrO4
        gateway  136.243.110.129

iface eth0 inet6 static
        address  2a01:4f8:181:1123::2
        netmask  128
        gateway  fe80::1
        up sysctl -p

# Configuration so that our subnet is available for use:
auto vmbr1
iface vmbr1 inet static
       address   136.243.179.113 #Add ANY ip address of the subnet
       netmask   255.255.255.240 #This is the netmask of that particular subnet
       bridge_ports none #bridge settings
       bridge_stp off
       bridge_fd 0
Be careful of your netmask, as it depends on the subnet you have. If you have /28 it will be 255.255.255.240 where as if you ordered a /29 subnet it would be 255.255.255.248 etc. You can find this out by hovering over your subnet in the Hetzner panel.
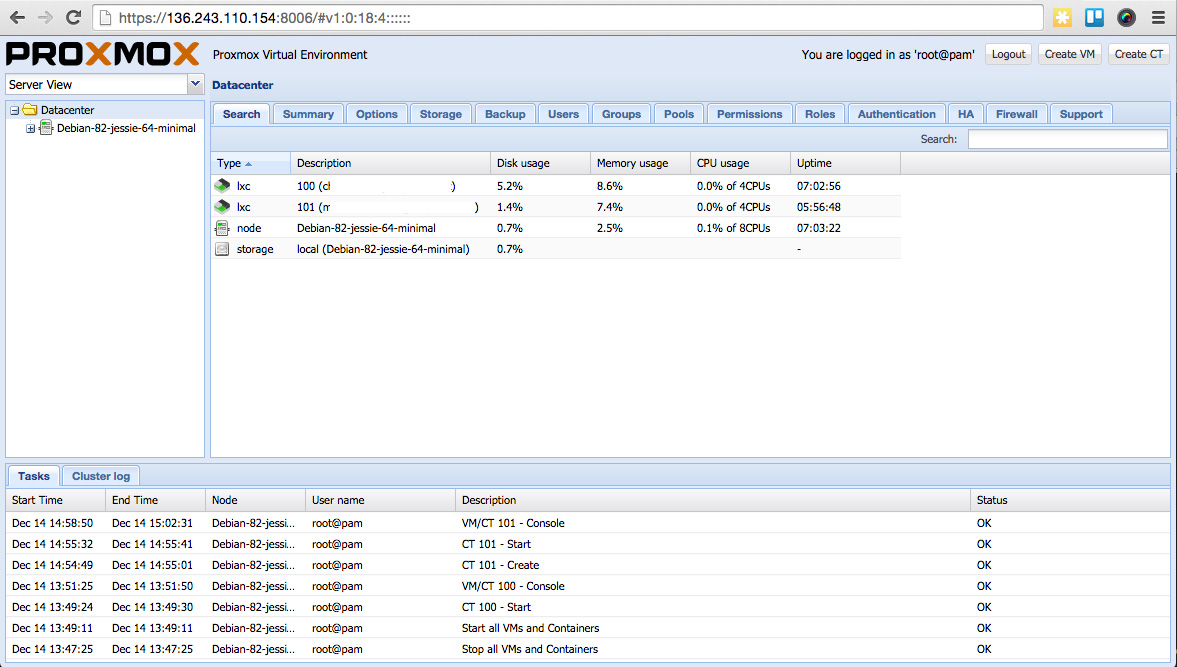
Step 4: Proxmox web interface and our first container
The Proxmox installation comes with a web interface from where you can manage your containers. You can login to the web interface on port 8006 in our case: https://136.243.110.154:8006/
Before you can create your first container you need to download some OS templates. To do this:
1. Click on the “local” icon in the left sidebar
2. Click on “Templates” in the top tab
3. Select the OS images you want to download (for our example, we will download Ubuntu 14)
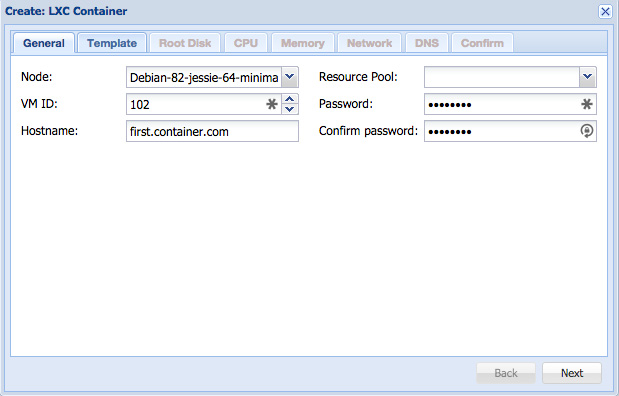
After you’ve done this, you can click on “Create CT” in the top right corner of Proxmox and it will present you with a dialog for creating your first LXC container.
The first step will look something like this:
The most crucial part is the network step:
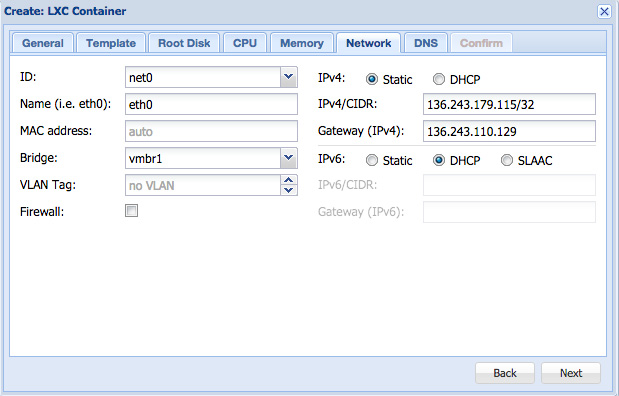
You must set the gateway as the gateway IP address we used in the network configuration. It’s also different from the previous version of Proxmox as you have to add /32 as a subnet mask on the IPv4, as to let Proxmox know how many IP’s you are attaching to the virtual machine.
Once you do this, you can start your VM and it should be accessible from the web!
I did not test/configure IPv6 for this tutorial, but if this helped you can also have a look at an older tutorial done by Hetzner for Proxmox v3.x (Thx to Mawan for his intro to Proxmox).